Showing posts with label decoupage. Show all posts

25 June 2011

Happy Birthday to my Beautiful Miss Mia!!!!!!

Today, June 25th (or "half Christmas" as I just heard it called... LOL!) is my beautiful, gorgeous, phenomenal, awesome, sweet-as-a-peach niece's Birthday.  She's 8.  I cannot believe that she's 8!  I told her a few weeks ago that she's not allowed to get any older. She just smiled, and then tried to (accidentally) drown me in the pool.

Anyhoo, I made a bracelet a while back that I finally finished last week, and my mom commented that Mia would like  it.  So I made her one of her very own.  And, because I love to stamp, I made her a special card to go with it...

Here they be!


This is actually one of the 2011 Sale-A-Bration Stamp Sets, Sweet Summer. I CASE'd it from a card by Amanda Coughlin here. It's a little girl for my Mia girl!

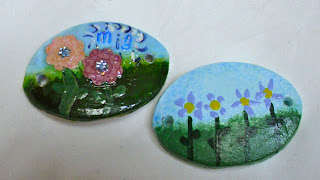
The focal is part of an old belt, that I painted, applied some punched flowers and tiny gems, and stamped her name on it.  I like this because it allows me to combine all my crafty projects into one! The chain is my first ever daisy chain! I hope she likes it! 

 Happy Birthday, my gorgeous girl!  I love you!!

Painted Bracelets

Awhile back, I got the nifty idea to paint this weird little wood-like thing that used to be part of a belt I had.  I'd already made some of these things into jewelry (you can check it out here), but I was bored, so I decided to take it to another level.

So it took me a while, but I finally managed to get the first one I did onto a spiral rope bracelet:

Paint, punches, and sparklies! What more can a gal ask!

Here's some more, waiting to be bracelet-ed up:


Kinda like the flowers my old nail tech used to paint on my nails! 

This one is actually all done, but that's another post...

And finally, the one I painted tonight:

I painted another dolphin! And I have an AWESOME plan for the bracelet!!!

As you can see, it's rather smallish! 
Eventually, these will be making it into my Artfire store. I only have 2 done so far, but I have ideas for several more!  Stay tuned!

25 September 2010

Dollar Tree... the untapped crafty resource

Seriously, it is... I cannot tell you how many things I have found at the Dollar Tree that have, eventually, made their way into a craft of some kind (including a pair of earrings that I have gotten more compliments on!  Pics in a minute...)

I've bought scrapbooking papers there, jewelry findings, stickers, weird knicky-knacks, frames, flowers, clear pumpkins (one of the latest purchases!) I even found adhesive there once (okay, it wasn't great, and either the Stampin' Up! Adhesive or Glue Dots work WAAAAAAAAAYYY better, but it's perfect for testing stuff and then ripping it apart again!)

I've seen several discussions recently about craft stores and whatnot, and thought it was time someone came out and said it--sometimes the cheapest supplies help you create the niftiest things.  With that in mind, I thought it might be nice to post pics of some of the things I've made, and have gotten complements on, that I've used Dollar Tree supplies in.  Hope you like them!

Okay, so ages ago, I decided I wanted some blingy earrings.  This is what I came up with:

[caption id="attachment_298" align="aligncenter" width="300" caption="The Carousel Earrings--made possible by the bead cap there, which came from Dollar Tree. The rest of it--sterling chain and swarovski crystals!"][/caption]

So, I found the end clips, where the card hangs, for these lanyards at the Dollar Tree, in a mix with key chain loops:

[caption id="attachment_83" align="aligncenter" width="227" caption="The hooks came from Dollar Tree, everything else from a craft / bead store."][/caption]

So I mentioned key chains? Yeah, here they are:

[caption id="attachment_82" align="aligncenter" width="300" caption="The key rings, and possibly the tiger tail, all from Dollar Tree..."][/caption]

And papers!  They have awesome scrapbooking papers (sometimes; admittedly it can be hit or miss). In fact, I've never used the more expensive papers I have, but I've used Dollar Tree papers in every major decoupaging project I've done:

[caption id="attachment_296" align="aligncenter" width="300" caption="the tea tray... The base was from Michaels, the papers are Dollar Tree..."][/caption]

[caption id="attachment_174" align="aligncenter" width="300" caption="All the papers used in this project came from the Dollar Tree..."][/caption]

[caption id="attachment_200" align="aligncenter" width="300" caption="Again, the box came from Michaels, but all that beautiful bright paper came from the Dollar Tree... and maybe the ribbon, too... I can't remember... "][/caption]

So you see?  It's a wonderful resource!  If you haven't been, you should go wander. And don't feel discouraged if you don't find anything.  Maybe they're just having an off day! (and don't get me started on the storage possibilities for all your crafting stuff from the Dollar Tree...)

RLW

12 September 2010

Super Crafty Fun Weekend!!!!

Yup, I had a super-crafty-fun-weekend! and it was grrrrrreeeeeeeeaaaaat!!!!! (insert Tony-the-Tiger voice here...)

Okay, so, first, I decoupaged a box that that I'm using as a jewelry box for the pieces I want to sell (you know, rather than the cardboard box I had them in).  I even put a little handle on it and mirror inside it! It's really cute.  Here it is:

[caption id="attachment_200" align="aligncenter" width="300" caption="All finished!"]
[/caption]

Now, of course, getting to this point, what with the Mod Podge and the cutting and the mess (you should see my sweat pants--covered in modgy fingerprints.  Oh yeah--and I used paint, too!) was quite a bit of chaotic fun!

I started with all my shtuff...

[caption id="attachment_193" align="aligncenter" width="300" caption="Like how I laid it all out so nicely for a pic? :)"][/caption]

And then, of course, about half-way through, I realized I needed more shtuff. No pics of that, though... So then I got to painting the inside.  Also, no pics.  There was far too much mess going on to pick up the camera. I'm gonna wait a few more months before I get paint on it.

And then I had to measure.  Well, sort of.  I did measure the sides so I wouldn't waste too much paper, cause it was all pretty and stuff! But of course, I only measured the one time, and so my measurements aren't all spot on. My father would be so disappointed (he's a pro at the measuring thing...) But in the end, I did find a use for most of those left-over paper bits I did end up with (more on that in another post. Tomorrow, maybe...)  So, after all the measuring and the cutting and the modgin' and the podgin' was done, I ended up with this:

[caption id="attachment_195" align="aligncenter" width="300" caption="kinda cool, if I do say so myself...."][/caption]

So then, for the finishing touches.  I really wanted a handle on it, and I had visions of a suitcase like handle, but I have no spare suitcases, so I had to improvise something else.  I also wanted it to have a bit more interest goin' on up top there, and I have these large chip-board butterflies.  I have no clue where they came from, but they've been in my stash for awhile. So I took some of that paper and 'podged it up, and painted the ugly cardboard sides.  While I was at it, I took a length of pink ribbon and raided my bead stash for some large hole beads.  I found some great wooden ones, and strung those on the ribbon.  Then, to the toolbox I wandered!  With the help of my trusty staple gun, I attached the ribbon, and then used my E-6000 epoxy to attach the butterfly on top.  And wah-lah! A handle and some interest!!!

[caption id="attachment_196" align="aligncenter" width="300" caption="gotta love E-6000!!!!!!!"][/caption]

As the glue dried, I was pondering the inside.  Okay, truth be told, the glue wasn't so much dried as still very glue-y when I thought "Hey, a mirror would be cool!"  And it just so happens, I had a perfect mirror to use!  Back to the E-6000, slapped some dollops on the back of the mirror, press it into the inside top, prop it open, and then a few minutes later, discover that the glue from the butterfly is now dripping onto the coffee table.  Oops!!!  So I flipped the whole mess upside-down! Eventually, it dried.  well, the butterfly bit did.  I discovered the next day, after I closed the  lid for a few minutes, that the mirror bit was still oozing.  So, back open it went!  Finally, that all dried.

Then, I realized, there's no easy way to see yourself in the mirror if you're playing with jewelry, since it just flipped all the way open... so, I had to add some catcher-thingies... I'm sure they have an actual name, but I know not what it is.  Anyway, I used more ribbon, E-6000, and eyelets.  And let me say, I need a punch that will punch a hole in ribbon... that was not fun... and in retrospect, this part should get done BEFORE the mirror goes in... But I made it work:

[caption id="attachment_197" align="aligncenter" width="300" caption="Just hammer those eyelets in there! And use the E-6000 to make sure they stay!"][/caption]

And that was it!  Here's some more close up shots, after the fact:


[caption id="attachment_202" align="aligncenter" width="300" caption="And finally, filled with stuff!"][/caption]

You know, I'm really tempted to make another one to use as a purse. It's too cute!! And more on the rest of my crafty weekend soon!

RLW

09 September 2010

Mini Patchworked Table

OMG! I had so much fun with this!!!!!  Okay, a few days ago, I saw this dresser over at Mod Podge Rocks! blog. And, once I saw it, there was nothing for it but to spruce up the dull little table that holds my desk spill overs... Here's the original:

[caption id="attachment_157" align="aligncenter" width="225" caption="poor, old, tired table..."][/caption]

Poor thing.  All beaten and battered. My mom found it years ago at a garage sale, so it has been truly used and abused. It really did deserve a make-over, don't you think?

So, first order of business, find all the supplies!  So up the stairs I went to the craft room, and armed myself with a mostly full jar of Mod Podge, some brushes (and the one lone sponge brush I could find) the FolkArt beige paint, the Dollar Tree Scrapbook paper (I love Dollar Tree Scrapbook paper... it's pretty good quality, and you get a little pack of coordinating sheets for a buck!  awesome!!!!!), and my paper cutter.  Cuz, you know, gotta have straight lines here.... Back down the stairs I traipsed, and got ready to 'podge!!!!

But, first I had to paint... not my favoritest thing, but I did have fun.  Although, I think I may have needed a bigger spongy-brush:

[caption id="attachment_160" align="aligncenter" width="300" caption="hmmm... an awful lot of area still to cover there...."][/caption]

But I eventually got it all covered, and covered well!

[caption id="attachment_161" align="aligncenter" width="225" caption="okay, yeah, still have to do that bottom section here...."][/caption]

So once the painting was done, it had to dry.  What to do when the paint is drying... Why not read a post over at Brave Girls blog? So I did:

[caption id="attachment_176" align="aligncenter" width="225" caption="Yeah, totally got the idea to document what I was doing while paint dried from the Brave Girl blog post I was reading while the paint dried... and watching some Netflix... :)"][/caption]

Finally, the paint dried.  Now to have fun with paper!!!  I love cutting up paper.  Well, I should, I make cards, and LOVE IT!!!!!! For the top of the table I just cut random-sized squares; I think the biggest was a 6-inch square, while the smallest was a 1-inch square. I think I also tossed in a couple of rectangles just to mix it up a bit.  Then, I arranged them in a pleasing manner, grabbed the 'podge, and went to town!  Man, did I make a mess.  But it was fun!  And in the end, very pretty (and can I just say, again, I soooooo need a brayer... bubbly bits all over the place!!!!) So here's the top:


[caption id="attachment_163" align="aligncenter" width="300" caption="not quite dry yet... oh, boy, more waiting!!!"][/caption]

Once I had that done, I turned my attention to the drawer:


[caption id="attachment_164" align="aligncenter" width="300" caption="stripeys!!!"][/caption]

And then I had to ponder the sides:


[caption id="attachment_167" align="aligncenter" width="300" caption="left"][/caption]

[caption id="attachment_168" align="aligncenter" width="300" caption="back"][/caption]

[caption id="attachment_169" align="aligncenter" width="300" caption="right (and oops on using the same pattern as the front...)"][/caption]

And the bottom shelf!  Basically, that was a repeat of the top, but with smaller pieces of paper:

[caption id="attachment_170" align="aligncenter" width="300" caption="and again, not quite dry! I'm an impatient photographer..."][/caption]

And then finally, it was dry and ready for a coat or two or acrylic sealer (okay, yeah, maybe I should do more, but the can is empty now.  AND!!!!! I'm down to half a jar of Mod Podge!!! yikes!!!!)

So here it is, all done and pretty:

[caption id="attachment_171" align="aligncenter" width="225" caption="The distance view"][/caption]

[caption id="attachment_172" align="aligncenter" width="300" caption="The drawer and knob"][/caption]

[caption id="attachment_174" align="aligncenter" width="300" caption="Pretty!!"][/caption]

So yeah, I am just totally tickled with myself!  I had fun!!!

RLW

07 September 2010

iPhone Case, Take 2 (or, fixing 'when decoupage goes wrong...")

So, a few weeks ago, as ya'll know, I decided to decoupage my iPhone cover.  Quite frankly, it didn't turn out so well (very cute, but not terribly functional, and I had to have my boyfriend of the crazy-strong-hands to get it off the phone... oops...) Here's a pic:

[caption id="attachment_135" align="aligncenter" width="300" caption="oopsy..."][/caption]

So, over the weekend, after crazy-strong-hand-boy took it apart, I had great fun ripping off the multiple layers of tissue paper and Mod Podge... really, it was almost more fun than putting it on the first time!

Anyway, here's the original case: You can see why I wanted to play with it... I mean, look at it... it's just so, so, dull.... so... not fun!!!!

So, anywho, over the weekend, I got all the stuff pulled off, and pondered what I wanted to do next... I'm a huge fan of Stampin' up!, and have this stamp set:

[caption id="attachment_151" align="aligncenter" width="300" caption="The Cat's Meow Stamp set"][/caption]

Isn't she freakin' cute!?!  I love her (I actually used her in a Christmas card a few years ago...) She's just so regal and catty... She's awesome... (unfortunately, I don't think she's offered anymore.  very sad...)

Okay, back to the project.  I painted the case a rather bland shade of beige (it's a FolkArt paint from Plaid that I, for some reason, have a very large bottle of. I never buy the large bottle! But thank goodness I did that time, as I've been using it nonstop this week!) Once I had the case covered fairly well (2 coats, I think) I experiment on a sheet of printer paper for the best way to stamp Ms. Kitty up there.  After some trial and error (and discovering that my black stamp pad--also from Stampin' Up!--is now purple... odd... Of course, I think I've had it for about 6 years...) I decided the best way to do this would be with paint.  So then I had to practice with the paint and the stamp (can I just say, I sooooooo need a brayer...) I finally got it all worked out, got the stamp all painted up, and very carefully pressed the phone case onto the stamp.  See, I figured the best way to not smear it would be to just leave the stamp stationary, especially since I was going to have to press, and the phone case is, without the phone, essentially hollow... and it worked! (yeah, I was all ready to repaint the whole mess... but I didn't have to! woot!!!)

So, after I had Ms. Kitty there, I just felt it needed something more. A few years ago I bought a gold Martha Stewart stamp pad, so I used that and some small stamps (including the flowers in the cat's meow set) to accent the cover.

[caption id="attachment_146" align="aligncenter" width="225" caption="The rough draft... (pre-podging...)"][/caption]

I tried to be all fancy on the cat, too.  Didn't work out so well in the end.  So, yeah, note to self, Martha Stewart Stamp pads, while cool, do not stand up well to sealer! (I added some gold paint to kind of antique the whole thing.)  So, you know, oops! I also added some gold paint for the collar, with little sparkling pink bits (I mixed red and silver paint) on that and the crown (there's a heart cut-out on the crown, so I painted it in.) After the Mod Podge coat, I sprayed the whole mess with acrylic sealer and let it hang out for 2 days.  Here's the finished project:

[caption id="attachment_147" align="aligncenter" width="300" caption="on my newly 'podged table! LOL! (more on that soon)"][/caption]

And another pic: And some detail from the front:

[caption id="attachment_150" align="aligncenter" width="300" caption="The detail of the front edge--I painted it an antique gold..."][/caption]

Now, unfortunately, I think this one is now stuck on the phone, too.  But at least I like it better!  And so far, no weird crackly-but-not bits!

Oh, and here's the real Ms. Kitty (aka, Buttercup...)

[caption id="attachment_152" align="aligncenter" width="225" caption="Da Buttah-bee.... "][/caption]

She's not been pleased with Mama lately--I keep locking her out of the craft room while I 'podge. The last thing I need is cat hair in the mix!  (oddly, her brother doesn't seem to care much... go figure...)

Thanks for reading!

RLW

04 August 2010

I just may Decoupage the world!

So, my friend Jess recently extolled the virtues of Mod Podge to me.  Mod Podge is a gluing medium used in decoupage, and probably for other things, but I used it for decoupage.  I've done a wee bit of decoupage in my life (if you're not sure what that is, Jess's blog post here sums it up better than I ever could) but I've never covered a whole piece, and I've never used Mod Podge.

So I had this tea-tray that I bought 3 or 4 years ago, and painted white.  Then I just never did anything else with it, until I started using it as a catch all tray for jewelry making (it's perfect for holding seed beads while I'm bead-weaving.) I don't even have any pics of it from then... not that I would, it was actually pretty ugly. Poor thing...

Anywho... Jess is a crafting queen, and is far more creative and talented than she gives herself credit for. She posted a table she Podged, and then some pics of actual artwork she's doing using decoupage and Mod Podge. (you can see them on her blog here. The pieces I'm referencing are towards the bottom, and, in a word, GORGEOUS!!!!!! I want a custom Jess piece for my walls!) So I got to pondering, what can I decoupage?  Then it hit me--the tea-tray!  So I did...

[caption id="attachment_58" align="aligncenter" width="443" caption="The base of the tray"][/caption]

I have lots of scrapbook paper, but I don't scrapbook (I make cards, but that doesn't use a lot of printed scrapbook paper.  At least, not the way I do it.) Since I wanted to cover the whole tea-tray, I decided to rummage in my stash and see what I could find.  I managed to find a beautiful Victorian-themed set of papers with roses and buds and stuff, and since that really appeals to me, I decided to run with it.  And because I'm a little bit anal about perfection, I even used my paper-cutter to get nice crisp edges on things (right down to creasing the paper before I made it go around corners.) And since my scrapbook paper wasn't quite large enough for all I needed it to do, I had to make little accent-y bits, too. And, because I can't leave well enough alone, I had to cover the whole thing in a coat of varnish with some gold, glittery paint mixed in, just to give that additional bit of antique-y feeling....


[caption id="attachment_61" align="aligncenter" width="614" caption="Fanciness! and accent-y corners!"][/caption]

But the best part, that happened after I got the Mod Podge (see, I just used watered down Elmer's for the sticking down of stuff).  I had no idea it could have that shine!  And that mess is thick, too!  Which I guess is good for protecting, because this is a piece that will get used.  Often.  Just not for tea...

So what's next?  Well, lo and behold, you can decoupage ANYTHING it seems!  I have plans for all my switch plates, cuz, also, fugly! And eventually, my coffee table.  But that's REALLY big and will require a bit more in the way of planning (and glue...)

Thanks for reading!

R.Wilson

Visit thecsiproject.com

27 July 2010

The Crafting season has begun!!

Well, for me, at least. My crafting season is the month between classes. I'm making earrings, working on a peyote stitch necklace (should be fun!  You can see the inspiration for this necklace here), I may cross-stitch a bit, I'm making some cards, and I'm wondering how to pay all the bills. But I'll figure it out!  I always do. I'm going to enjoy this month off, and maybe next week, I'll do some work to get ready for Fall Session. Or maybe not.  Maybe I'll take 2 weeks off... and decoupage!

So I'm watching Heroes for the 1st time.  I'm on Episode 5 or 6.  Can I just say, thank god for Netflix!?!?!  See, this is one of those shows where they, very meanly, leave you HANGING at the end of each episode!  UGH!!!!!

Okay, I'm over that now... Overall, pretty good show.  Lots of cuties...and a pretty good story.

Ah, vacation.  There's something to be said for a vacation.  Now if only I could go somewhere... Maybe next August.  Maybe this Christmas!

Have a great day!

RLW