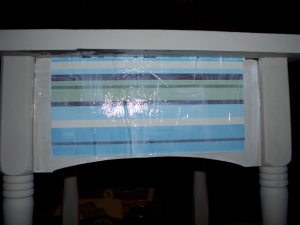
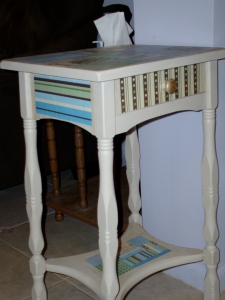
[caption id="attachment_157" align="aligncenter" width="225" caption="poor, old, tired table..."]
 [/caption]
Poor thing. All beaten and battered. My mom found it years ago at a garage sale, so it has been truly used and abused. It really did deserve a make-over, don't you think?
So, first order of business, find all the supplies! So up the stairs I went to the craft room, and armed myself with a mostly full jar of Mod Podge, some brushes (and the one lone sponge brush I could find) the FolkArt beige paint, the Dollar Tree Scrapbook paper (I love Dollar Tree Scrapbook paper... it's pretty good quality, and you get a little pack of coordinating sheets for a buck! awesome!!!!!), and my paper cutter. Cuz, you know, gotta have straight lines here.... Back down the stairs I traipsed, and got ready to 'podge!!!!
But, first I had to paint... not my favoritest thing, but I did have fun. Although, I think I may have needed a bigger spongy-brush:
[caption id="attachment_160" align="aligncenter" width="300" caption="hmmm... an awful lot of area still to cover there...."]
 [/caption]
But I eventually got it all covered, and covered well!
[caption id="attachment_161" align="aligncenter" width="225" caption="okay, yeah, still have to do that bottom section here...."]
 [/caption]
So once the painting was done, it had to dry. What to do when the paint is drying... Why not read a post over at Brave Girls blog? So I did:
[caption id="attachment_176" align="aligncenter" width="225" caption="Yeah, totally got the idea to document what I was doing while paint dried from the Brave Girl blog post I was reading while the paint dried... and watching some Netflix... :)"]
 [/caption]
Finally, the paint dried. Now to have fun with paper!!! I love cutting up paper. Well, I should, I make cards, and LOVE IT!!!!!! For the top of the table I just cut random-sized squares; I think the biggest was a 6-inch square, while the smallest was a 1-inch square. I think I also tossed in a couple of rectangles just to mix it up a bit. Then, I arranged them in a pleasing manner, grabbed the 'podge, and went to town! Man, did I make a mess. But it was fun! And in the end, very pretty (and can I just say, again, I soooooo need a brayer... bubbly bits all over the place!!!!) So here's the top:
[caption id="attachment_163" align="aligncenter" width="300" caption="not quite dry yet... oh, boy, more waiting!!!"]
 [/caption]
Once I had that done, I turned my attention to the drawer:
[caption id="attachment_164" align="aligncenter" width="300" caption="stripeys!!!"]
 [/caption]
And then I had to ponder the sides:
[caption id="attachment_167" align="aligncenter" width="300" caption="left"]
 [/caption]
[caption id="attachment_168" align="aligncenter" width="300" caption="back"]
 [/caption]
[caption id="attachment_169" align="aligncenter" width="300" caption="right (and oops on using the same pattern as the front...)"]
 [/caption]
And the bottom shelf! Basically, that was a repeat of the top, but with smaller pieces of paper:
[caption id="attachment_170" align="aligncenter" width="300" caption="and again, not quite dry! I'm an impatient photographer..."]
 [/caption]
And then finally, it was dry and ready for a coat or two or acrylic sealer (okay, yeah, maybe I should do more, but the can is empty now. AND!!!!! I'm down to half a jar of Mod Podge!!! yikes!!!!)
So here it is, all done and pretty:
[caption id="attachment_171" align="aligncenter" width="225" caption="The distance view"]
 [/caption]
[caption id="attachment_172" align="aligncenter" width="300" caption="The drawer and knob"]
 [/caption]
[caption id="attachment_174" align="aligncenter" width="300" caption="Pretty!!"]
 [/caption]
So yeah, I am just totally tickled with myself! I had fun!!!
RLW

[...] ourselves, and just generally have fun. So far, I’ve had one of my projects featured (the table I redid a few weeks ago), I’ve won a contest and received an awesome mystery art grab bag [...]
ReplyDelete