Showing posts with label crafter. Show all posts

08 August 2010

Recycled junk mail!!!!

So, you know that annoying junk mail you get every Tuesday? Yeah, I hate that... Most of it I dump directly from my mailbox into the recycle bin.  But every once in a while a piece makes it into the house.  oops...

Anyways, I opened one of these annoying pieces the other day, cuz I thought, "hey, why not?"  It was a visa offer (like I need another credit card...) but you know how you can get those pretty cards now? Yeah, it was one of those.  The pictures were all Zodiac signs... very cool. So I put the insert in my craft-stash to ponder later.  That was two days ago...

Three days ago I made a few poly-clay pendants, thinking that I would Mod Podge some pics of my niece and nephews onto them, for gifts, if they turned out okay. Unfortunately, none of the pics I have printed would work at all well for that, and I've run out of ink (boo...). Then yesterday, I remembered the pics from that Visa offer.

So I started pondering, and made this:

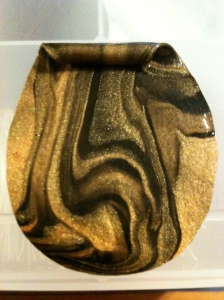
[caption id="attachment_76" align="aligncenter" width="225" caption="Zodiacs"][/caption]

Here's the back:

[caption id="attachment_75" align="aligncenter" width="225" caption="Swirlies!"][/caption]

So here's what I did: After pondering the 12 designs offered up in the mailing, I decided on the Leo, Pisces, and Cancer (right, that's the crab?) images as the best for this project. And I cut some backgroundy bits from the other pieces to fill in the gaps a bit.   Instead of painting the Mod Podge on each individual piece, like I normally would, I just painted a thinnish layer on the front of the pendant, so that I would have a base to arrange and stick the pieces to. It seemed to work best for this project.  After I had them arranged (actually, I arranged on the dry piece first, then did the Podgey process...) and stuck down to my satisfaction, I painted some Podge overtop.  After that layer dried, I painted another layer, and made sure to seal the edges and back of the pendant as well, so that it's all nicely shiny... Shiny is good....


This project holds a number of firsts for me.  It's my first mosaic piece, it's the first time I've mixed polyclay and ANYTHING else, and it's the first time I've used Mod Podge start to finish.  I can honestly say, I was very pleasantly surprised at the workability of the Mod Podge.  See, I usually use Elmers to stick stuff down, and until the tea-tray, I'd not used Mod Podge EVER.  I think I'm in love...

So, what am I going to do with this pendant? No idea.  It doesn't really match any of the jewelry types I wear, but I'm kinda loving it.  But I'm not sure about the ethics of selling it, either, since I have no idea who the original artist is so I can't give them credit (and here is the dilemma of being an English teacher and a jewelry designer.  I worry about plagiarism in art... kind of annoying actually!)


Ah, well.  In the meantime, I'm just going to enjoy my craftiness...

R.Wilson

07 August 2010

Ripping stuff apart is fun!

Okay, not so much "ripping" and taking stuff apart methodically so as to preserve all the original stuff to be used in making other stuff later. That's what I did a little while ago... I took apart a belt that I got years ago because it had these really interesting wood or palm-tree-bark-like thingies... See, like this:

[caption id="attachment_69" align="aligncenter" width="300" caption="This is the main piece. No idea what it's made of.... But it looks cool!"][/caption]

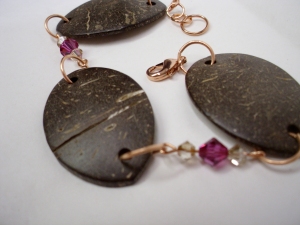
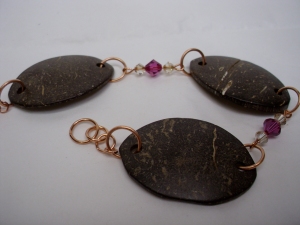
So yeah, I had fun pulling that belt apart. I've been looking at these pieces for ages, and I decided to work on something today.  I made a bracelet, and I'm pondering earrings.  Here's the bracelet:

[caption id="attachment_71" align="aligncenter" width="300" caption="No idea what to call this bracelet... "][/caption]

I love the pink swarovski with it.  Kinda makes it pop, you know?

[caption id="attachment_70" align="aligncenter" width="300" caption="Maybe I'll call it "Stuff"..."][/caption]

Eh, I'll work on a name before I post it to Artfire.  And I think I'm gonna go with "faux wood" on the materials list and leave it at that!

R.Wilson

04 August 2010

I just may Decoupage the world!

So, my friend Jess recently extolled the virtues of Mod Podge to me.  Mod Podge is a gluing medium used in decoupage, and probably for other things, but I used it for decoupage.  I've done a wee bit of decoupage in my life (if you're not sure what that is, Jess's blog post here sums it up better than I ever could) but I've never covered a whole piece, and I've never used Mod Podge.

So I had this tea-tray that I bought 3 or 4 years ago, and painted white.  Then I just never did anything else with it, until I started using it as a catch all tray for jewelry making (it's perfect for holding seed beads while I'm bead-weaving.) I don't even have any pics of it from then... not that I would, it was actually pretty ugly. Poor thing...

Anywho... Jess is a crafting queen, and is far more creative and talented than she gives herself credit for. She posted a table she Podged, and then some pics of actual artwork she's doing using decoupage and Mod Podge. (you can see them on her blog here. The pieces I'm referencing are towards the bottom, and, in a word, GORGEOUS!!!!!! I want a custom Jess piece for my walls!) So I got to pondering, what can I decoupage?  Then it hit me--the tea-tray!  So I did...

[caption id="attachment_58" align="aligncenter" width="443" caption="The base of the tray"][/caption]

I have lots of scrapbook paper, but I don't scrapbook (I make cards, but that doesn't use a lot of printed scrapbook paper.  At least, not the way I do it.) Since I wanted to cover the whole tea-tray, I decided to rummage in my stash and see what I could find.  I managed to find a beautiful Victorian-themed set of papers with roses and buds and stuff, and since that really appeals to me, I decided to run with it.  And because I'm a little bit anal about perfection, I even used my paper-cutter to get nice crisp edges on things (right down to creasing the paper before I made it go around corners.) And since my scrapbook paper wasn't quite large enough for all I needed it to do, I had to make little accent-y bits, too. And, because I can't leave well enough alone, I had to cover the whole thing in a coat of varnish with some gold, glittery paint mixed in, just to give that additional bit of antique-y feeling....


[caption id="attachment_61" align="aligncenter" width="614" caption="Fanciness! and accent-y corners!"][/caption]

But the best part, that happened after I got the Mod Podge (see, I just used watered down Elmer's for the sticking down of stuff).  I had no idea it could have that shine!  And that mess is thick, too!  Which I guess is good for protecting, because this is a piece that will get used.  Often.  Just not for tea...

So what's next?  Well, lo and behold, you can decoupage ANYTHING it seems!  I have plans for all my switch plates, cuz, also, fugly! And eventually, my coffee table.  But that's REALLY big and will require a bit more in the way of planning (and glue...)

Thanks for reading!

R.Wilson

Visit thecsiproject.com